Hulda Clark Zapper Schematic 30 kHz and 1000 Hz

It is easy to create a variation of the breadboard zapper by changing the R2 resistor in the schematic above. You are not limited to only the 30 kHz and 1 kHz as published by Dr. Hulda Clark.
To experiment with many different frequencies when building a Zapper Breadboard Kit, all you would need is an assortment of 1/4-Watt Carbon-Film Resistors and a Multi Meter with Hz setting to test frequency output.
If you have already built the 30 kHz Zapper Kit, start by removing the 4.7k (yellow-violet-red-gold) resistor that connects pin 6-7 of the 555 CMOS Timer on our Breadboard Kit at G9-J10, and replace it with other resistors from the 500 piece assortment.
For instance, to make the output approximately 2500 Hz (also written as 2.5 kHz) use a 68k (blue-gray-orange-gold) resistor or a 56k (green-blue-orange-gold) resistor to get close. A 62k resistor would work best.
Here's a nifty trick: When you place two of the same resistors in parallel divide their individual number by two. To create a 60k resistor you would need to use two 120k (brown-red-yellow-gold) resistors placed in parallel for a Zapper output of 2500Hz. Place the first 120k resistor between G9-I10 and the other between H9-J10 for a Zapper circuit with 2500 Hz output.
A Hulda Clark Zapper is defined by Dr. Clark as any square wave frequency from 10 Hz to 500,000 Hz, with 50% duty cycle, powered by a 9 volt battery, using copper handle electrodes, and at least 1/4 volt Positive Offset (meaning no negative output, and no negative spikes). Regardless of frequency, the wave form must be all positive, and the 39k resistor at R5 does the job of keeping the output Positive Offset. As long as the only resistor you change is the R2, you should be good.
Here is a PDF list of 67 different frequency variations from 14 Hz to 214 kHz

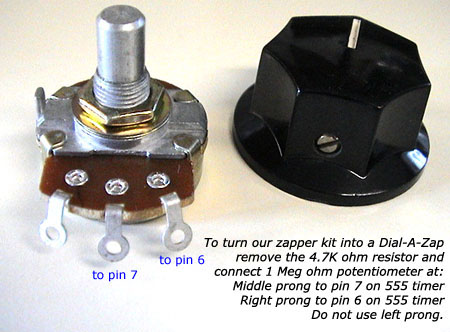
Turn your Zapper Kit into a Dial-A-Zap
If you are interested in experimenting further with our Hulda Clark Zapper Breadboard Kit, it is quite easy to turn the circuit into a device we call a Dial-A-Zap. By adding a 1 Meg Ohm Linear Taper Potentiometer to the circuit, the user can adjust the output to vary the frequency from 150 Hz to 300,000 Hz, with many frequencies in between.
If you have already built the 30 kHz version of the Breadboard Kit, all you would have to do is remove the (Yellow-Violet-Red-Gold) 4.7K ohm resistor found on the Breadboard at G9-J10, and replace it with the 1 Meg Pot to have a variable output. Each potentiometer will also need a big plastic knob to make it easy to control the frequency. You can get a Potentiometer and Knob from an electronics shop. Shaft on potentiometer fits through a 5/16 inch hole and you cut the shaft to length to fit the container that holds your final project.
In order to read the output on your Dial-A-Zap, one will need a Multimeter with Hz setting to act as a digital frequency counter. Use alligator leads to connect the circuit outputs to copper pipes, and connect the multimeter to the pipes as well. This way you can read the frequency output on the multimeter (set multimeter to Hz setting). This is one of the most cost effective ways to have a nice little battery operated frequency generator without spending $500 or more.
Build a Hulda Clark Zappicator Chair

In 2004 Dr. Hulda Clark published the directions for an experimental device called a Zappicator. A Zappicator consists of a 1000 Hz low frequency Zapper connected to a North Pole Speaker. This allows the zapper frequency to pass through a speaker instead of having to hold on to copper handles. Whatever is in the magnetic field receives the benefit of zapping. If you do not like to hold handles or cannot, using a Zappicator Chair might be for you. Sit, relax, read, watch TV, and zap all at the same time.
You can either build a 1000 Hz Kit Zapper, or purchase a Dual Frequency Zapper and set it to 1 kHz (1000 Hz). You will also need a North Pole Speaker, a Plastic Lawn Chair, a Hot Glue Gun, and about 40 inches of Insulated Hook Up Wire.
Connect the speaker's paper face to the underside of the chair by running a ring of hot glue around the circumferance of the speaker's face, and hold it in place until it sets. Be careful to not let the glue drip and burn you. Turn the chair upside down and work safer that way. Glue the speaker in the middle under the seat where you will sit.
Connect only the Positive (+) output of the 1000 Hz Zapper to the (+) tab on the North Pole Speaker.
When using the Zappicator Chair wear clothing that has no metal. No zippers, no rivets. Sweatpants and a sweatshirt are ideal. Remove jewelry and have nothing in your pockets, no change, keys, or cell phone.
Set the zapper as far away from the chair as the length of wire allows. Don't use a wire too long so that you lose too much voltage. The 30 - 40 inches of wire is good. Don't place zapper under the chair, put it to the side. Turn the 1000 Hz Zapper on, and sit on the chair for a few minutes. Start slow by only zapping for a few minutes at first, and work up to 20 minute sessions or longer as you get used to your new Zappicator Chair.
Want to know why metal is a problem? Metal reverses the polarity and then the device does not work. Especially ferrous metal. Ferrous metal is any metal containing iron. It is easy to tell if metal is ferrous if a magnet will cling to it. The way a magnet clings to metal is by converting the metal to the opposite polarity. If you connect the north side of a magnet to a refrigerator, the metal it touches turns south. Since opposites attract, the magnet clings. If you turn the magnet around, the ferrous metal simply changes polarity depending on which side of the magnet touches it. The physics of magnetism is astounding.
Using the long lead wire, the positive (+) output on the 1 kHz zapper is connected to the (+) on a North Pole Speaker. The ground (-) output is not used at all. The RF frequency is just as amazing as magnetism. RF frequency does not require a complete circuit to work. The 1 kHz frequency passes through the positive (+) output of the zapper to the (+) of the North Pole Speaker's magnet like an antenna. It works much like a radio when picking up a broadcast using a single antenna. The Zappicator phenomenon ends if the circuit is closed, so only connect the positive (+) output from zapper to speaker's (+) tab as instructed.
Dr. Clark defines a North Pole Speaker as any two inch 4 or 8 ohm speaker, with an exposed magnet ring on the back, that also attracts the N from a compass toward the paper face of the speaker. We avoid metal because it would turn the North polarity to South and then the device does not work.
Place the zapper as far away as the lead wire allows so any metal in the zapper will not interfere. The North Pole Speaker will create a field of energy several feet above the speaker. Be sure to use an all plastic chair to avoid metal screws or parts.The Hulda Clark Zapper has not been licensed as a medical device by the US FDA. The Build Your Own Zapper Kit is sold as an educational tool only. No medical claims are intended by the sale of these electronic parts. Our Zapper Kit is a great project for a school science fair or to learn the basics of building simple electronics. Please note that when ordering electronic parts and kits we can assume no liability on the customer's ability to use them. Safety, craftsmanship, experience, and ability are the user's responsibility. Electronic parts are small and fragile. We can not offer refunds or replacements on electronic parts. Buy electronic parts and kits only if you believe you can accomplish the work.
The 555 CMOS Timer is the most likely part to need replacement, so it may be smart to order extras when building a kit.
The 555 CMOS Timer is vulnerable to static electricity. If you walk on a carpeted floor and the 555 receives a static shock it may burn out and need replacement. If you ever touch the 9-volt battery backwards to the battery snap, it may burn out the 555. You may want to protect your 555 by adding a 1N914 Switching Diode to your kit.
